 Port Credit Marine Surveys & Yacht Delivery  Sharon & Wallace Society of Accredited Marine Surveyors  American Boat & Yacht Council |
Moisture Meter Mythology , NDT(and a soupcon of Thermal Imaging) OK, right up front .... this article is not designed to discourage you from buying a moisture meter so that you have to hire us instead. Rather the point is that 90% of the time you do not need a moisture meter or a surveyor to determine if your decks are wet as in most cases a small hammer will suffice. Use of a meter on decks, topsides or superstructure is reasonably simple but not without caveats, some which we'll will show below. We do believe that an inexperienced user is completely wasting his time and money if he tries to meter a bottom as this is often a much more complicated exercise and even more difficult if cored. Foam cored rudders are a much simpler animal and quite easy to detect foam decay or separation by sounding, sometimes the meter works and we'll show you why it's only "sometimes". |
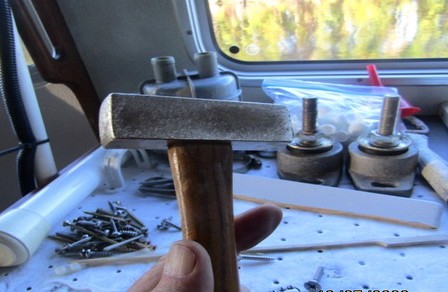 |
| The Hammer - Some use rubber mallets or hard plastic
hammers. We prefer small brass hammers and
a very, very light tap. The bounceback is
every bit as important as the sound and feel
at point of impact. in over 5,000 surveys
we have never marked a boat but we have added
a piece of masking tape over the face when
owners object . There are three critical
elements to using the hammer. 1. SOUND - The sound of hitting FRP laminate, hitting
laminate over an attached bulhead or frame
member, dry core or wet core are all different.
2. FEEL - The "feel" at impact on the
differing areas just mentioned will all be
different. 3. BOUNCEBACK - the bounceback of the hammer (if any)
on all these differing areas are also very
different ... think of the different bounceback
you'd get from a soft wet piece of balsa
wood vs. a snare drum. |
||
|
There are those who will tell you that meters
are easy to use but I don't believe that
is the case. There are many things that can
confuse them. It's important to understand
how they work before you can know what they
are telling you and whether you can trust
the readings or not. So first a few facts
..... |
||
| Here we are going to focus on cored structure
because 99.9% of cruising sized boats have
cored deck and superstructure and some boats
also have cored hulls. It is more complicated
to measure/sound cored structure but I'll
also touch on a few examples of solid FRP
that can also produce misleading numbers.
I used moisture meters for a couple of years
before I realized that much of what I believed
was not actually panning out to be accurate.
I live close to one of the biggest repair
facilities on Lake Ontario and got to see
boats opened up after I had made moisture
determinations. My conclusions were right
most of the time but incorrect often enough
to scare me. In order to gain a better understanding
of what I was seeing on the meter I started
building a few test panels, cored and un-cored.
I froze them, heated them, drilled holes,
cracked them with a hammer and submerged
them for months at a time. I'll show you
a few examples further on So lets jump right in with one of my hard learned lessons ...... |
||
 |
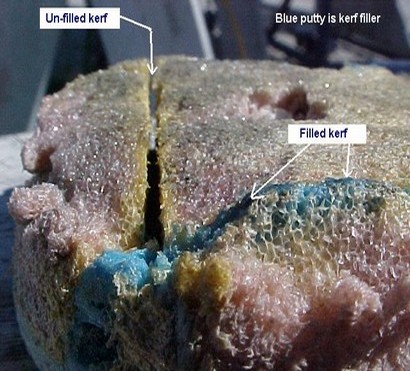 |
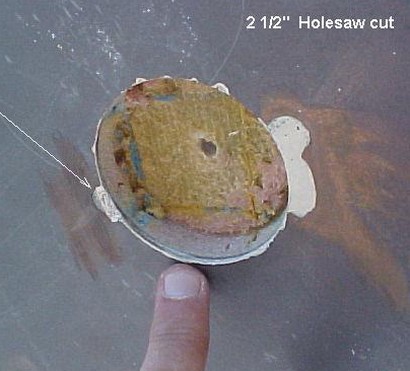
| ABOVE - Many years ago I found wildly different (low to very high) meter readings across the bottom of this foam cored X -Yacht and my hammer soundings were also highly variable. I eventually gave up and recommended a plug be pulled to determine the true condition of the core. What I found was that the core was very well bonded to both inner and outer FRP skins and there was no measurable moisture at all. A great number of the kerfs were un-filled and this produced the variable soundings. Some kerfs were filled with a blue "putty" that sent my meter into the very high range. How many holes will the inexperienced user drill to confirm what the meter is telling him ? How many $15k epoxy bottom jobs have been sold because of false high moisture readings ? | |
| In the late 90's to early 2000's Sea Ray
had a number of well publicized issues with
balsa core saturation in some of their hull
models. They had not sealed the core where
they cut through the hull to install the
air intake/output plenums in the topsides
leading to extensive balsa decay an a number
of lawsuits. The manufacturer of the core
was brought into the picture to defend Sea
Ray with a number of magazine articles and
seminars for surveyors. I attended one of
these seminars and their story was that even
high moisture levels in balsa did not significantly
reduce the strength (tests proved this part
true, to a point) and that balsa cannot decay
unless exposed to oxygen and bacteria. They
forgot a couple of things, first if water
is getting into the core, by definition so
is oxygen. Second they didn't even know that
anaerobic enzymes existed and will feast
on the balsa without oxygen. What does this
have to do with moisture meters ?.... If
the FRP skin has disbonded from the saturated
core, the meter will not pick up the high
moisture as there is no continuity between
the materials. If the core has completely
degraded to a state of near dust (more common
than you'd think) there is little moisture
to measure so the meter shows low numbers.US MIL-specs call for balsa core to be kiln
dried to not more than 15% nor less
than
5% moisture with an average of not
more than
12% in any one batch and to be maintained
in that condition up to the point of
construction
so your balsa had moisture in it right
from
day one. There are two principal reasons for this MIL-spec, a). Fungal or bacterial growth is unlikely below 15% moisture content and b). Adhesion of resins whether polyester, vinylester or epoxy is greatly reduced as moisture content in the core is increased above this level. So if the factory and storage conditions are up to MIL-spec standards, the balsa in your deck should have started out with not more 15% moisture by weight. How many pleasurecraft builders have the environmental controls in their warehouses to achieve this ?. I witnessed many Canadian builders over the years store skids of balsa in the parking lot and never saw one with an environmentally controlled production facility. Chances are fair that your balsa core had too much moisture in it from the day the hull was molded.. The major advantage I have with meters is that over the years I have seen hundreds of structures opened up after I had taken readings. This has allowed me to see exactly what the meter was saying and it was not always what it appeared. In fact I saw so many high readings that had nothing to do with moisture and quite a few saturated cores that showed low moisture that I am now a little skeptical. I do use a meter but try to check high readings by other methods as well. |
|
 |
|
| Another edge I have are my test panels ......... this (above) one came from a J-24 that broke up on the rocks at Port Credit Yacht Club and I grabbed a piece of the hull. I marked it off in 6" squares, left some of the original core in some squares and changed others. Over time I've had squares of Nidacore, Corecell, Airex, Nomex, Coremat, thin balsa, thick balsa, anti-bacterial balsa, carbon fiber, metal plates embedded in resin, left others with no core.and as you can see I have removed the gelcoat in one square. I have also induced areas of core separation and delamination and keep it submerged for months at a time at PCYC. I occasionally pull it out to play with or to demonstrate at various seminars. Here I am going to use it to show some problems with moisture meters. Each square is isolated by an epoxy barrier so measurements across any one square should be pretty consistent with only very minor differences within each square. But first, what these numbers mean on my Electrophysics digital meter. As you will see other brands of meters produce very different numbers. While the Electrophysics shows a dry reading of 10 and a wet reading of 20, another brand may show a dry reading of 170 and a wet of 230............the numbers are meaningless its the difference in the numbers that you are interested in. | |
| Electrophysics meter | WHAT THESE NUMBERS MEAN ON CORED STRUCTURE (Again ..... only with the Electrophysics meter) | 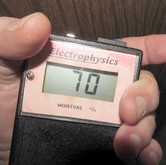 Moisture content of my hand |
| 10 - 13 | Low = Core is dry to the touch. | |
| 14 - 16 | Slightly elevated = Faint moisture can be drawn by applying light pressure to the core through a paper towel. | |
| 17 - 23 | Elevated = Slight amount of moisture is visible in core when squeezed by hand pressure. | |
| 24 - 39 | High = Droplets can be squeezed from core with light finger pressure. | |
| 40 + | Near saturation = Moisture is clearly visible in the core without pressure applied. | |
| Note : These interpretations above are valid for
my meter only. We don't really care about
the numbers on uncored structure. The saturation
point for polyester resin is less than 2%
and the bottoms of most polyester boats will
get there at some point in their lives, sometimes
within a few short years. Saturation in solid
glass is not always a problem but if it is,
it will be visually noticeable in the form
of certain types of blisters (No meter required)
or easily found with my little brass hammer.
In rare cases, moisture in the laminate can
be a serious issue and you can read more
about that in Osmosis Mythology. |
||
| Meters can give fairly accurate percentages
of moisture content in wood and in fact come
with tables of settings to be adjusted for
hundreds of different species. Some also
give a recommended setting for FRP but this
is meaningless on cored structure and almost
as meaningless on solid FRP since the formulations
& types of resins, laminate schedules
and even laminate fabric cannot be known
and may affect the readings. All they can
do on FRP (cored or uncored) is provide relative numbers. So whether a meter shows from 10
to 55 or between 118 and 219 is irrelevant.
The point is that it shows a difference.
i.e. there is more capacitance here than
over there so there may be more moisture.
So throw out the calibration block and the
little booklet of scale settings that came
with your meter and remember the numbers
you see are relative and look for relative
differences when using the meter. So you plunk down $350 - $750 for a meter, stick it on deck and see a reading of 15%, move it a few inches and see a reading of 30%. What does that mean ? Well it doesn't mean "percent". Get that word right out of your head. it means that something on, in or under that surface has higher capacitance but not necessarily caused by moisture. Anything with higher conductivity will produce higher readings. Things likely to have higher conductivity are bottom paints containing metals like copper, carbon and various oxides. If a metal tank or an electrical conductor is touching the inside of the hull or deck, the meter may pick it up. If a metal plate is embedded in the laminate (rudder stocks, chainplates, deck fittings, motor mounts, backing plates etc.) they will likely show higher readings whether you know they are in there or not. Some gelcoat colour pigments contain metals such as aluminum oxide or titanium dioxide which will produce higher moisture readings and there are a few manufacturers who use gelcoats that will show extremely high numbers right out of the mold. Condensation or even dirt on the opposite side of a thin laminate can also cause high readings and carbon fiber will show moisture readings equivalent to your meter being submerged. Very rough non-skid patterns (reduced sensor contact) or an FRP skin that has separated from the core can show false low readings. Boats in salt water areas must be thoroughly washed with fresh water and dried as salt on the surface will hold moisture and give false readings. Taking accurate readings on inside surfaces can be questionable as anyone who has spent time in salt water can tell you, salt is everywhere inside the boat. If paint or coatings are affecting the meter and you are not permitted to sand some off ... Do the next best thing, Try to measure the area of concern from inside the hull, actually you should inspect all inside surfaces where you've found high moisture on the outside.. Moisture meters become more useful when dealing with cored materials as long as the overlying FRP is not much thicker than 3/8" thick (no meter I have seen is reliable at reading much deeper than that) and if the FRP/core bond is intact.. Some manufacturers claim their meters can read up to up to 1 1/2" deep.... maybe in a lab, certainly not in any boatyard I frequent. Moisture in balsa core shows up quite readily on the meter as does water in supposedly closed cell foam cores or water trapped between the FRP and the core. |
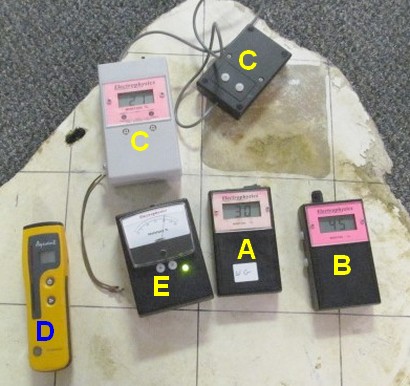
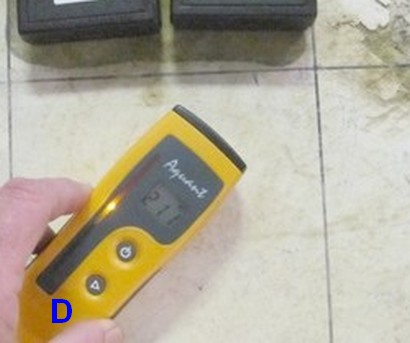
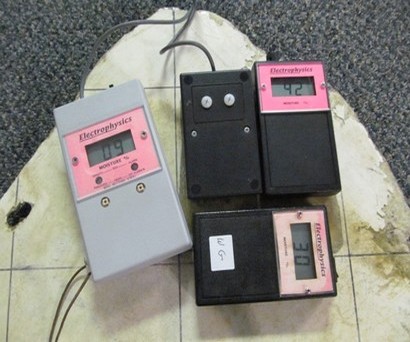
| The Meters Each meter in the following photos is identified by an alpha character. There are two "C"s because that meter has a remote sensor. You will not be seeing meter "E" again as that was so incredibly erratic it was absolutely useless. The calibration of these meters is so sensitive that simply putting it on a surface may be enough of a bump to change it. You will notice that on my meter (A) the adjustment knob has been removed. Years ago I set mine in its most sensitive position and removed the knob. Since we are dealing with relative numbers, as long as you know what those numbers mean in real terms, calibration is irrelevant on cored structure. I am not a fan of analog meters as just sliding them along a surface can cause the needle to move and trying to count gradient lines on the display is a PITA. |
 |
 |
|
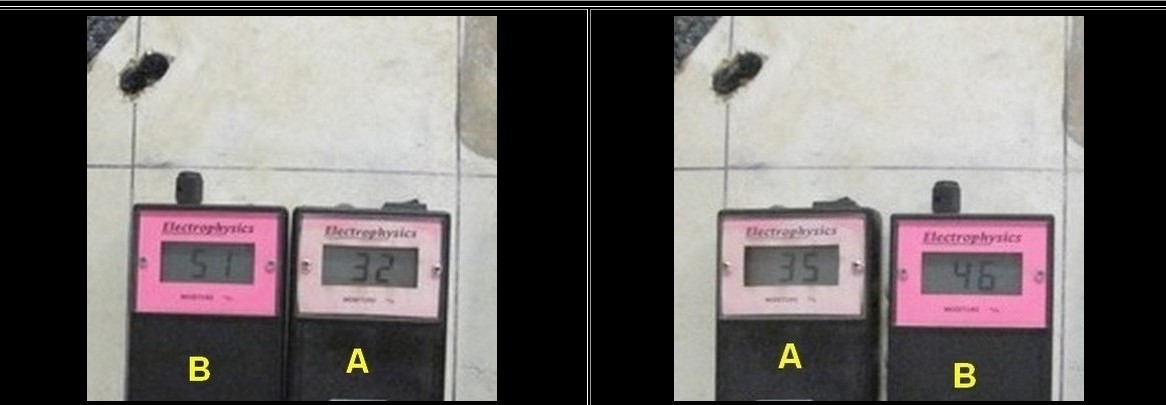
| ABOVE - Two meters is the same square, then
position reversed. Actual variance across
the square is no more than three points.
What do these readings tell the inexperienced user ? No, I am not going to tell you ... that is my point but there is a good reason obvious to an experienced operator |
 |
 |
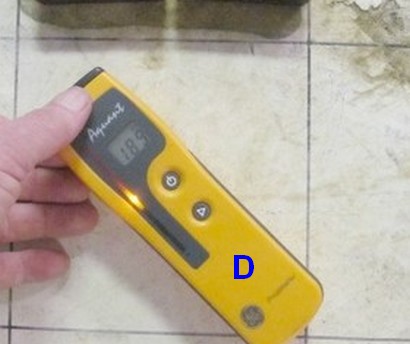
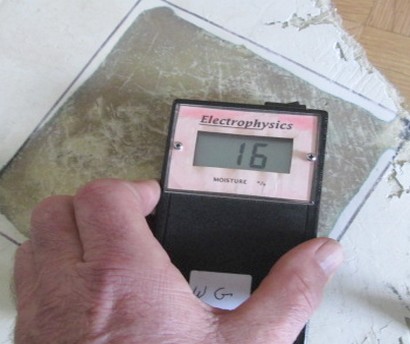
| ABOVE - A simple change in orientation of this meter causes a 12% difference in the the reading from 189 to 211 in the same square | |
 |
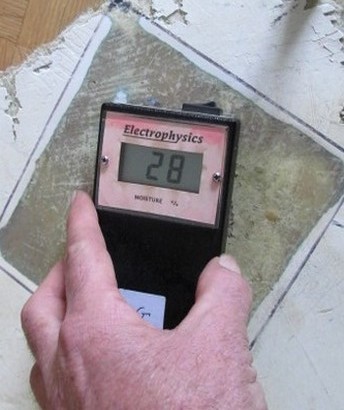 |
| ABOVE - another example of orientation changing the meter readings in the same square | |
 |
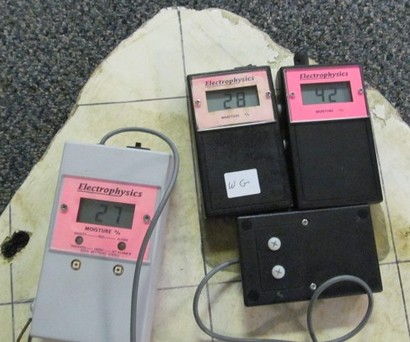 |
| ABOVE - All of these meters were calibrated on the same sample (to match my meter) then moved around. Do you see much consistency here ? I have done thousands of boats with my meter and know it well enough to know when it is not making sense. If I ever have to buy a new meter it will take me weeks with my various test panels to feel comfortable with it. | |
 |
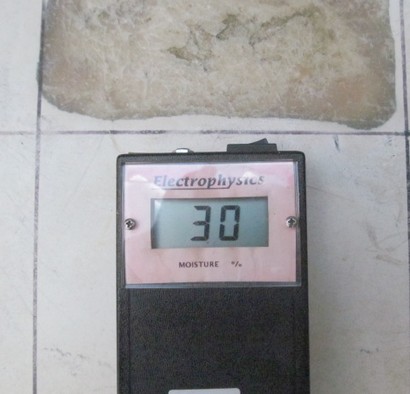 |
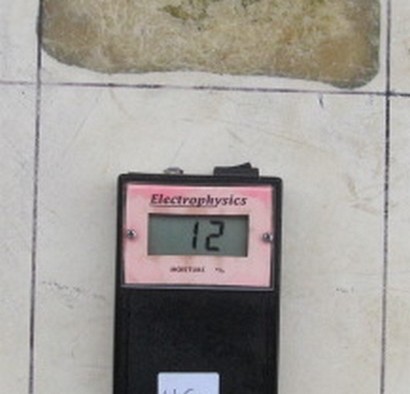
| ABOVE - Photo at left shows low moisture after the panel had been left outside in slightly sub-zero temperatures overnight. Photo at right shows the same square after the panel had been brought indoors for a few hours. Many years ago I did a lot of testing with frozen blocks of bits of decks and hulls and was convinced that I could determine moisture content in frozen core ..... I was wrong ! What worked in the kitchen did not work in the field. In the kitchen at ambient temperature the meter was warm enough to create a thin film of moisture on the frozen bit and register on the meter. Outside in below freezing temperatures this did not occur. When water freezes it expands by about 8%, The crystallization that causes the expansion results in a lot of non-conductive space within the water thereby greatly reducing the effectiveness of the meter. When meters are unreliable we can use the percussive sounding method, unfortunately this too goes out the window because frozen core whether balsa or plywood sounds solid. I need the work as I don't have much in the winter months and may survey certain frozen boats (balsa cored hulls excepted) as long as you are willing to live with the limitations (and put it in writing). My best advice .... wait til' spring. | |
| AT RIGHT - Both of these readings were taken
on different boats at the 2014 Toronto
International
Boat Show, Neither boat had ever been
in
the water and both measurements taken
above
the rub rail. So why the close to 45%
difference
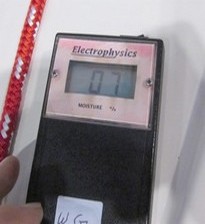
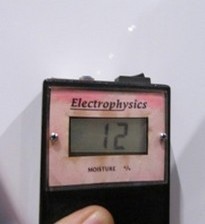
in the readings on the same meter ? Different resins ? different laminate schedule ? Different gelcoat formulation ? PS. The reading of 7 is the lowest I have ever seen. What does that mean ? Could it mean resin starved laminate ? They would have thrown me out if I had started whacking it with a hammer. PS. I did get thrown out once for taking photos of non-compliant gasoline ventilation systems, in fact I could not find a compliant boat that year. See Safe Gasoline Powered Boat Ventilation. |
 |
 |
| AT RIGHT - Note the chalk line on this sailboat bottom and see that the meter shows 15 above the chalk line and 30 below. .. we have found an anomaly that does not necessarily indicate higher moisture The higher reading may be caused by a different barrier coating under that area or the fact that the hull laminate along that chalk line changes and something in that change is affecting the meter. All we know is that something is different and worthy of further inspection. | 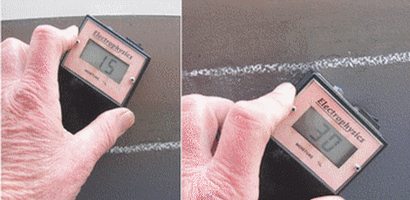 |
|
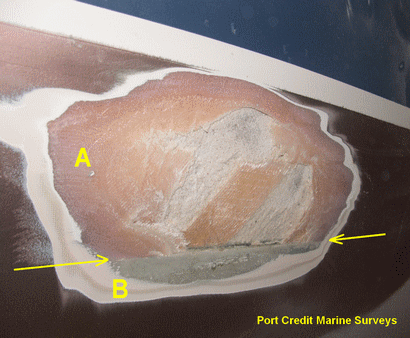
| AT RIGHT - Same boat as above - Percussive
soundings indicated other anomalies
in the
same general area and when she was
opened
up we found no moisture but a variety
of
different patch materials including
what
I'm sure was bondo and some delamination.
This one turned out to be a hurricane
Katrina
cover up job. You can read more about this boat in Buying a hurricane Boat |
 |
|
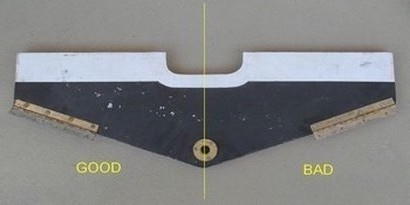
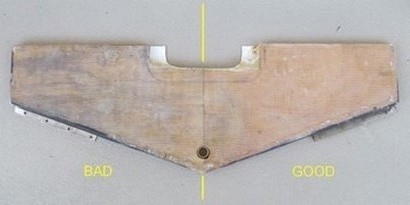
| My home made sample panel below was built
to mimic a powerboat inboard/outboard transom
and these are almost always cored with plywood.
I built the left (GOOD) side of the panel
below with the plywood totally encapsulated,
the trim tab (strap hinges) screws properly
bedded, one half of the transom drain and
one half the edge of the i/o cut out is also
sealed. The right side (BAD) is built as
they do in the factory. i.e.caulking on trim
tab screws and the wood not sealed at the
transom drain or i/o cutout. I have also
built in a void to demonstrate percussive
sounding and to show that the meter will
read very low over a void even though the
underlying wood is soaked. This panel too
has spent months submerged with various anti-fouling
paints applied. You can see darker colouring
of the plywood on the back side of the BAD
half where moisture is spreading quite readily.
Very few i/o powerboats have dry transoms
after only a few years and I have seen saturated
transoms after only a couple of years. It is also worth noting that US MIL-specs permit up to 18% moisture in plywood so you also have to adjust for that in your interpretation. Plywood will not start to decay until it hits 21% moisture ( as mentioned in the MIL-spec). Running your meter along a deck will show higher readings when it passes over a plywood bulkhead bonded to the underside and again this is not necessarily an issue. I once witnessed a marine surveyor put his meter on teak decks and state the were "saturated". Be aware that one cannot determine the condition of underlying core through teak decking. Such decks must be metered from the underside where and if accessible. This was the same idiot I'd previously watched put a meter on a lead keel and pronounce it "saturated". |
||
 Exterior side |
 Dark area on interior side show beginnings of decay |
|
 |
 |
|
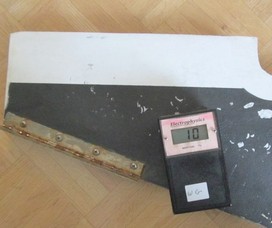
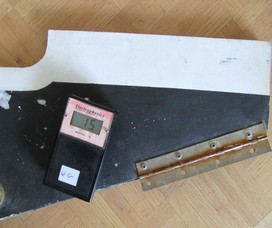
| BAD side - Meter reading 55, very high moisture levels and as we've seen, decay of the plywood has begun. | BAD side - Meter reading 10, as low as a new boat. So why are we seeing low readings over sopping wet plywood ? Because in this particular spot I built in a void where the FRP skin is not in contact with the plywood so no continuity between the skin and the core, the meter sees almost nothing. My hammer will easily find this spot. | GOOD side - Meter reading 15 - would be getting close to a "slightly elevated" rating on balsa core but is actually a little lower than normal for a plywood core. |
| Nothing I have learned has convinced me of
the invulnerability of these meters. I have
found a lot of false positives caused by
high capacitance fairing compounds, body
filler, paints, metal fuel/water tanks touching
the interior surface of the hull, plywood
bulkheads bonded to the underside of the
decks or electrical conductors in contact
the the inside surfaces. Many of these meters claim to read deep in
to the structure yet none of the several
meters I have played with were reliable
at
much more than 3/8" deep. The various manufacturers of moisture meters
sold for marine purposes make what
I believe
to be grossly overstated claims on
their
websites. For a totally accurate meter reading on bottoms, coatings should be removed. Few sellers will allow bottom coatings to be scraped as necessary for an accurate determination. Generally buyers are also unwilling to pay the costs necessary for the yard to first block the boat and scrape the paint, then re-coat after analysis. If there are reasons to suspect a serious moisture problem, such as water intrusion in a cored hull, you may have to take core samples to be sure of the condition and most sellers also resist this. Depending on the paint type, I've found that about 6-12hrs out of water is sufficient for hard ablative paints to be metered reasonably accurately, 24hrs for soft ablative paints and for some like VC17 1hr. is sufficient on a warm day. And as stated previously some paints with a high capacitance will always preclude moisture measurements. |
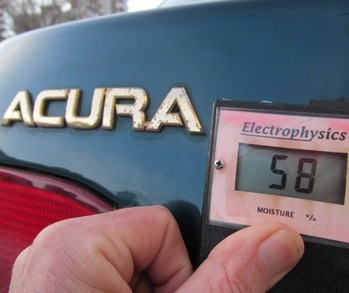 This Honda Acura is saturated ! This Honda Acura appears to be saturated |
||
| If you have stayed interested this far you may be interested in Frozen Boat Surveys and the use of moisture meters in below freezing weather and Osmosis Testing which is closely related to moisture meter mythology. | |||
| International Institute of Marine Surveyors
"Code of Practice for the Measurement
and Analysis of the Wetness of FRP
Hulls" This code specifies the correct use of moisture meters and their standard includes the following ... "The surface must be carefully cleaned. A large number of random 4" x 4" areas must have paint or other coating removed down to the gel coat. The vessel should be out of the water at least 24 hours. Minimum number of measurements must be = approx. one per sq. meter (3.3 feet) or 50-100 on the average 35-40 foot boat". The average 30' uncored hull can absorb a maximum of about 2% water as contrary to popular beliefs, polyester resin is hygroscopic (not waterproof). For a 30' uncored boat this is just a few pounds and it can take months to dry out once exposed by removing the gelcoat. The only way to accurately measure moisture content is to cut a piece from the hull, weigh it, bake it for a couple of weeks or burn it, weigh it again and measure the difference. Thats not going to happen in the course of a normal marine survey. Moisture content is NOT a predictor of blisters and don't let anyone tell you different. While blisters without moisture are highly unlikely, thousands of boats out there have had high moisture levels for decades without a blister in sight. I use the meter in my left hand and a hammer in my right. I use it as a backup and second guess and yes I make mention of the readings in my survey reports but only because so many people ask for them. I don't personally believe they are of much value on the bottom of a boat unless the previously mentioned "Code of Practice" is followed and even then it's only going to tell you what we already know.....boat bottoms are wet ! There are several places now advertising these meters to the general boating public suggesting they are cheaper than hiring a surveyor. Don't waste your money, even an untrained ear can detect soft balsa core under FRP in most cases. Invest about $9.00 in a small brass hammer instead. A high reading on the meter in conjunction with a dull sounding report from my little brass hammer is an almost certain indication of a problem but even the hammer is not infallible, if the laminate is thicker than usual or if wet core has separated from a thicker than usual FRP laminate or even how the boat is blocked or supported may affect percussive soundings. What we are really dealing with is an educated guess from an experienced (hopefully) marine surveyor. Sometimes there is just no way around taking a core sample but the meter should never be used as the sole arbiter. By the way If you find a little brass hammer in your bilge could I please have it back ? |
|||
| THERMAL IMAGING CAMERAS
A couple of marine surveyors in Ontario started advertising that they now perform thermal imaging in the course of their surveys so I thought I'd better learn a bit about the subject. In addition to my playing with moisture meters I have also spent a couple of years years playing with a thermal imaging camera. I bought the cheapest ($1,600 at that time) Flir camera on the market to educate myself and determine it's value before forking out serious money for a good unit. I played with my test panels for hours on end, spent many more hours with online courses, wandered around boat yards and scanned a number of vessels being chopped up at Port Credit Harbour so I could see what was inside the structure after I scanned it. I also got to play with a $35,000 fire department imager. What I learned was that these cameras are amazing ...... and totally useless in the course of a normal survey in my market. Proper imaging is time consuming due to the need for temperature differences required to generate a useful image and constant adjustment of the camera. A boat in a yard, sitting in the sun all day will not have the differences required for a good picture. These differences must be induced, either by heat lamps or a heat gun and only a small area at a time can be imaged (with all but the most expensive cameras) as the substrate temperature can change very quickly depending on conditions and materials being scanned. Overheating any given area can also cause false results so checking and re-checking is the order of the day. To accurately scan and report on a 40' boat would be an all day job ... if weather cooperates. . Home inspection, electrical or machinery imaging is not really that complicated as temperature differences are common and quite evident. A/C or heat leaking through a window is pretty easy to spot as are overheating exhaust manifolds or electrical contacts. For these purposes I believe a self taught thermographer could do quite well. Boats however with various laminate schedules, wide ranging materials and various construction techniques are much more complicated. Trying to force a temperature difference and then read an area of three different laminate schedules within a couple of feet, bottom paint, highly reflective white hulls, cored and uncored areas is extremely difficult and a high resolution (at least $8k +) camera is required. Then comes interpreting the image. The thermal images of my test panel shown below give an indication of how difficult these interpretations are. In todays market if you are spending less than about $8k (in Canada) for one of these cameras for use in surveying boats you are wasting your time. They work exceptionally well in some circumstances as is in the 30 seconds it took me to find a hairline fracture in a carbon fiber mast, so if you have a carbon fiber boat, buy a thermal imager today. Unfortunately I don't see enough carbon boats to justify this equipment. I found an area of a hull that was 3mm thick after scanning a hull for about three hours..... it would have taken about 10 minutes with my little brass hammer. The huge amount of time spent inducing a temperature difference with heat lamps or heat guns and compensating for emissivity or reflectance makes these cameras impractical in the course of a normal survey as few people would be willing to pay for the many extra hours involved when 99.9% of the potential issues will be found by other methods. There are a few "Level 3 Certified Thermograhers" in the big dollar yacht and damage survey markets in Florida and California making a living with these cameras (much of it from teaching thermography courses) but with the $15,000 to $30,000 units and crystal clear resolution. If you are spending a few million on a megayacht, whats another $4,500 for thermal imaging. For an insurance claim on a very expensive vessel, the underwriter may not mind popping for a scan to determine damage ..... for your 30yr old Catalina or Sea Ray .... it ain't gonna happen. These cameras are very complex and just setting up the various parameters in the option list is tricky. understanding those parameters and interpreting the results is even more difficult. Getting certified as a "Level 3 Thermographer" is very expensive and I would not trust anybody who had not achieved certification to produce an accurate image or interpretation. So yes, there is a place for them but certification costs about the same as a decent camera so I can't justify it for the type of work we do. |
|||
 |
 |
 |
 |
| The above thermal images of my J24 test panel
(at beginning of this article) were taken
in various conditions and clearly show the
complexity of the images and how critical
proper interpretation could be. |
|||

